In the excitement of building a new website, it is easy to rush in and forget to read the fine print.
I still remember going through the process of accessing the cPanel provided by my web host and taking the simple steps to install WordPress. And then what; where do I go from here?
WordPress had been recommended to me. But, HELP… where are those experienced WordPress users when I need them?
Eventually, I realised that experts were not required to teach me how to log into a WordPress dashboard. All I needed was to read some information that would clearly explain the process.
Table of Contents
Let’s Start With a Few Words About Domain Extensions
Before I describe the procedure of logging into WordPress please read the information about Domain extensions.
- When you decided on your Domain name, you chose an extension. In the example, I use the domain extension ‘dot com’. Your extension may be dot org, dot uk, dot ca or one of many other extensions. Whatever the extension to your domain name, logging in is the same.
- Another fact to point out is that this procedure is for WordPress.org.
It does not relate to WordPress.com
- WordPress.org is a free content management system. All information, including descriptions and images in this article, relate to WordPress.org
Procedure for Logging Into your WordPress Dashboard
- In the Search Bar of your Internet Browser, type in the Domain name for your website. (See image below)
- Depending on your web host company the prefix will be http:// or https:// or www. In this image, I have used https:// and the extension .com
 It may be sufficient to type your Domain name, without the prefix. It depends on your Hosting company.
Now that you’ve entered the correct domain name with the correct extension, add /wp-admin (See text example below)
Example: https://yourdomain.com/wp-admin
Now press ‘Enter’ on your keyboard, and the Log-in page will appear (See image below)

In the first area, enter the Username you chose for your Domain.
In the lower area, enter the password you chose for your Domain.
Then Click the Blue button to log in to your WordPress Dashboard.
If you forget your password, it’s easy to get a new password by clicking on ‘Lost Your Password’ and following the simple instructions.
Getting to Know the WordPress Dashboard
 Now that you’re logged into your Dashboard, it’s time to
familiarize yourself with the various tools.
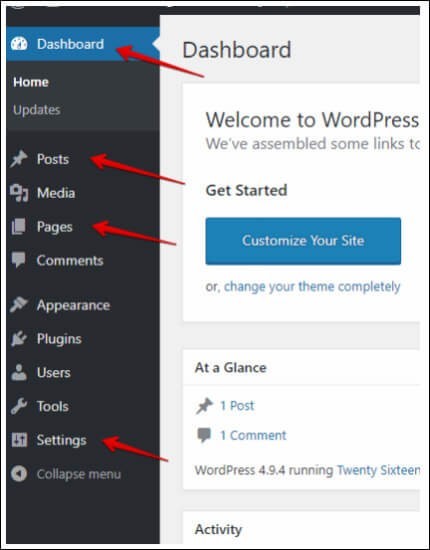
- There is only one Dashboard although the image gives the appearance of two dashboards.
- What we are looking at here are the items identified with the four red arrows.
- The reason for an Arrow pointing to ‘Dashboard’ is that the main features you will be using with your WordPress website are listed in the black coloured area.
- Posts, Pages and Settings are features you will need to use to set up the first pages and posts on your website.
- Items not identified here by the Red arrows will be discussed later or in another article.
 Preparing for Your First Post
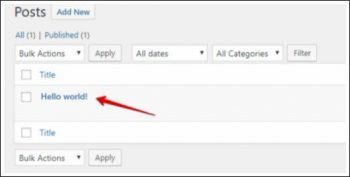
When you click on ‘Posts’ in the Dashboard, this is what you will see:
- A message that says “Hello World”.
There’s not much you can do with this message, so click on ‘Hello World’ and you will see another message that says:
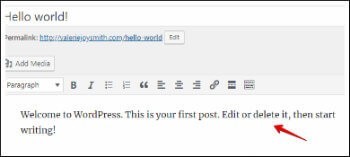
- “Welcome to WordPress. This is your first post. Edit or
or delete it, then start writing!”
Your best choice is to delete this post and start a new one.
WordPress refers to ‘Trash’ rather than ‘Delete’.
To trash this unwanted post, here’s how we do it.

- Click on the link to the right-hand side
of the Welcome message to trash the post.
Now the dashboard is ready for you to start creating the first post of your new website
How to Create a New Post
Whenever you are ready to start a new post, go to the black coloured column of your Dashboard, click on Posts –> Add New
On the right-hand side, there are two tabs labelled Visual and Text
The Text tab produces the HTML code of your content. You do not need to be concerned about HTML code at this stage.
Just make sure you are working in the Visual tab where you have access to Bold and Italic text and various other choices to improve your content.
For instance, you may wish to create a bullet list or a numbered list, and that can be done easily with the tools available
How to Create a New Page
To create a new page, go to the Dashboard and click on Pages. The first time you do this you will see a ‘Sample Page’. You have the choice to trash this page in a similar manner to trashing the first Welcome post.
I recommend trashing the Sample Page and starting afresh by going to Pages –> Add New
When to Use Pages or Posts
Deciding to create new content on a page or post depends on the type of website you are building.
If you plan an educational website or any informational site, you may wish to use pages for the more significant part of the content. If you choose to add a blog to that website, you would need to use posts.
It is not usual to allow comments on Pages. But allowing comments on Posts is standard procedure.
I prefer to use posts on my website for most of the content. However, I do use pages as well.
Usual Practice for the Use of Pages on All Websites
For the administration of legal information on a website, it is normal to use Pages. This applies to:
- The ‘About’ page
- Privacy page
- Disclaimer page
- Disclosure page
All Affiliate Marketing websites should include each of those 4 pages.
Settings in WordPress
There are a variety of settings within the Dashboard, but in this article, we will look at just one setting. The reason is, that for the post or page you want to be viewed first when someone searches for your website,’ page displays’ must be set correctly.

When we click on the Settings tab, as shown in the third image from the beginning of this article, it opens to what appears in this image.
Click on ‘Reading’ as shown in the image above. You will then see how to set the static page of your website.

As you can see from this image, there are two options. The first is ‘Your latest posts’
The second is ‘A static page.’
When I created this website, I chose the Homepage to be a static page entitled ‘Getting Started Online With Your First Website’. That can be seen in this image.
An option would have been to display my latest posts. The settings would have been the first and last options appearing in the image.
I have included this information within this post because I remember how discouraging it was when I couldn’t get the correct page or post to appear on my new website.
Enjoying the Amazing WordPress Dashboard
I refer to the WordPress dashboard as ‘amazing’ because I know how difficult it was to build a website before being introduced to WordPress in 2010.
When you’ve spent some time on WordPress, I’m sure you will love the wonderful features it offers.
Another thing I enjoy about WordPress is its frequent upgrades. Since 2010 the WordPress platform has advanced tremendously, making it very easy to build a professional website.
The Appearance Feature
This feature you will frequently use, although I didn’t include it within this article.
One of the essential features accessed from ‘Appearance‘ is the website Menu. To learn how to create a Custom Menu, Click Here.
There are many more articles on this site that will help you with building your first WordPress website.
Thank you for visiting this website. I hope this article has been of help to you.
If you have any questions, please leave them below. Your comments are also welcome.
Nice introduction to WordPress. Working on websites from scratch in the past, it’s nice to work on WordPress that does a lot of work for you, especially with plugins. Once you get the initial steps done, it’s pretty easy to add pages and posts. Too bad I didn’t know this years ago. I probably would have done more with WordPress. Thanks!
Thanks Kevin for visiting the post and leaving your comment.
Absolutely, WordPress is so easy to use. As it is with many things in life, once we know how to get to get started it’s straight sailing from them on.
Really good breakdown on how to use WordPress. Before actually doing it, I thought making a website or at least the initial stages to making a website would be very tough. But, since WordPress has been a thing honestly, it has become a breeze to create a website. I feel as if your explanation was very easy to understand and I wouldn’t probably find it to be too bad a post to share with my friends who also what to make a WordPress website in the future.
Thanks for the post!
Thank you Amhil for your comment on my recent post about logging into the WordPress Dashboard. Steps such as explained in the post are simple when we’ve done them once. But, to those new to WordPress each step can be tricky. I well remember my experiences in earlier times of becoming familiar with WordPress.
Thank you so much for this detailed post! I was completely at a loss when I first started using WordPress, and with sites like yours, people can now be guided through the whole process much easier! Great content!
Thanks very much Rox for your positive comment. It’s very helpful after producing a training style post to receive comments from someone experienced with WordPress, as it is in this case.